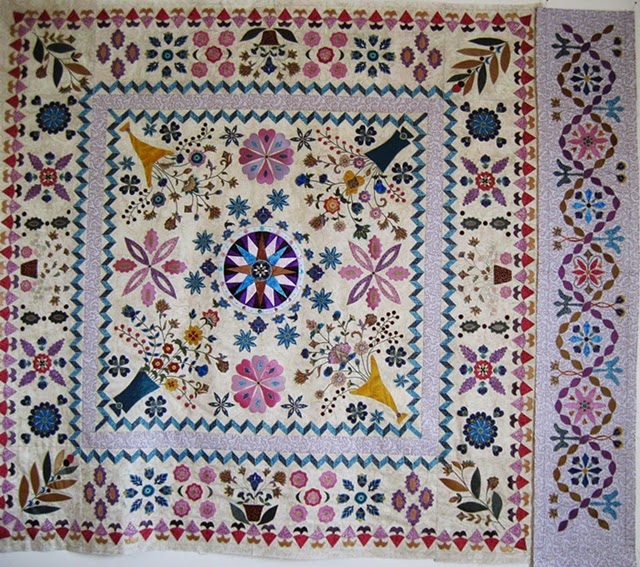
Hi Everyone,
Have had a wonderful but frustrating couple of weeks since I last wrote my blog.
Last week Northland suffered from gale force winds and torrential rain for four days. The worst days being on my days off and I don't think I stepped outside once. I didn't risk turning on my sewing machine as even with a surge protector I was worried about the effects of a sudden power cut.
The wonderful part was my DH had only outside work so we were able to spend my 3 days off together, keeping warm and watching TV.
I kept playing with ideas for the next border of LE, decided 12 different fabrics for the swags was too many so cut it back to only 6 and planned to repeat them across the border.
As soon as I had printed the pattern I cut my first 12 swags.and placed them on my pattern.
Awkward photo angle as I was standing on my steps, holding my camera over the table and not sure what I was taking, but what I thought was great initially, did nothing for me now.
I started to think about what I didn't like. Finally the lightbulb turned on, no major elements in my LE are scrappy and I am being influenced by Esther's image of many fabrics in this swag border. I have much more symetry in my version and now I want scrappy - NO I don't think I do.
So what next - Luckily I had to go into town and sign a paper at work agreeing to my employment contract being transferred to the new buyer of the company I work for, who may go unconditional this week.
This had been more good news after several weeks of uncertainty about the companies and my own future.
So, paperwork signed, I headed to Countrydawn my favorite fabric shop which used to be a 50 min drive away but recently moved to central Whangarei - and expanded so fabric, fabric fabric only 10 mins away!!!!
Should have taken my camera but didn't think of it, I will next trip.
What a great time I had as plenty of room to lay LE out on the floor with the pattern for this border alongside her, I can't do this at home any longer. A gathering from around the shop began and grew with a mix of wonderful comments and questions about the design of LE. Several went home intending to check out Esther's Blog and her/our group.
Finally a unanimous decision was made, and this is now my outer swag material.
Another funny angle as the rest of the border is still under my machine foot. It is my original background fabric and am amazed how differently the pattern shows in this photo, probably the camera angle. I love being back using this fabric.The second line from the left is the positioning line for my blue zig zags, first line is my cutting line.
The swag fabric is another Robert Kaufman Fusions fabric with the gold overlay that I love, it has all the tones of the other Persian style fabic I used and I am loving how it looks, although I wasn't going to add more fabric's, OH well I will just do what LE tells me too, Lol
Yesterday was a marathon as I want to use my original inspiration fabric in place of the Fleur de Lis but I need 52 if they are all the same. Even with an extra metre of fabric I only have 24 of the shape I want to use.
Found a shape I could use for the centre in each border, this helped so I only needed another shape for another 24.
This is the result.
The 3 larger shapes are what I wanted to use all the way around these borders, last used around my center compass. The central motif seems to work fine and finally heart tear drops complete this half of the border.
I tried them first using Esther's pattern and cutting them in the Fleur de Lis shape but they just seemed to heavy.
At this stage only the top swag is stitched.
I am cheating with the second swag and cutting the curved shape as one piece. It is another new fabric with the same tones as the top fabric but with the addition of lilac's and green's. I cut them individually first but lost the shading with the overlaps, also discovered I needed 72 per border so this a much better option for me!!!!
Another discovery, while preparing my favorite medallion I found 4 of them have a black highlight - not white. Thank goodness there are 4, two borders will have them equally spaced and two won't. Not something I would want to discover on the last border.
So this is where I am at, happy with what I have so far but no idea yet how my double bows will look.
Have ideas for a mix of inspiration fabric broderie perse and Esther's pattern for the lower part of the border
But this beautiful border is very complex so it definately is - one step at a time.
Linking now to Esther's WOW.
Cheer's everyone, Jenny
Thursday, 17 July 2014
Wednesday, 2 July 2014
Work of Wed 2nd July
Hi Everyone,
Last week I finished my Willow Tree corners and LE is back on my wall
I love how the willow tree's look, though if I had had any fabric left from my corners stone blocks in the last border I would have varied the branch tones. Don't have so couldn't do and not dwelling on it.LOL.
Esther, Love Entwined is such a wonderful design, Thank You so much for sharing it with us.
I never thought I would get this far but now my LE is asking for her next border. I am scared what I see maybe too much but am so looking forward, to both the challenge and going back to working with my original background fabric.
So what am I doing this week.
Have of course been thinking about part 14 and those swags along the border.
11 of the fabrics are what I have used already, the one at the left end an addition to give me my 12 but am not really happy with this option. so thinking I might use one fabric twice.
Liking this much better but still not comfortable with it. Now it is my taffeta's that have me wondering.
Plenty of time for more playing before the 15th.
With these on my wall, what else an I doing,?
Pulled out my Bamboo wallhanging to see where I had got to when it last got put away.
So that's where I got to!!! nearly finished echo stitching around the main leaves
Yes my batting looks unusual. Because this is a wallhanging and my background fabric is quite thick and heavy - it is an upholstery fabric - I have used a length of wool fabric instead of traditional batting.
Just pinned to the wall it is hanging nice and flat with only the echo stitching done so far.
Am not sure how I will quilt the open areas at this stage, am thinking of just stitching more bamboo leaves with black thread.
It's been out for a few days now but I still haven't started stitching yet, Lol
Because.
I have spent hours studying this pattern and looking for fabric's.
FABERGE by JINNY BEYER
I have had this pattern for some years. I love the colors and the 3D effect. Have always wanted to make at least one of Jinny Beyer's patterns and this one is now calling to me. Also helps that my DH loves it as well!!!
It would suit our lounge wall perfectly when we finally finish the room- i have plenty of time to make it at the current rate of progress on the room.
Of course the feature border fabric is no longer available but I have found a shop in Oamaru that must have the largest range of Ginny Beyer fabrics in NZ and over 75% of the correct ones for this pattern.
Cathy is now organising me options for what is no longer available so this is definately on my to do list.
Definately winter here in Northland, raining again so maybe I need to work on my Bamboo hanging, or change my swag fabrics around again!!
Enjoy your week everyone, Jenny
Wednesday, 18 June 2014
WOW 18th June
Hi Everyone.
Have so been waiting for this week and the release of Esther's Part 13 the Willow Tree.
From the time I first saw Esther's photo of the original coverlet I wondered if I could reach this stage in the quilt, for me this block makes such a statement within the whole pattern. Strength plus Shelter and yet such Gentleness is what I feel when thinking of a Willow Tree and it's softly moving branches in a breeze.
Did the original designer feel this as well or something totally different, I don't know but Esther your pattern is perfect in my mind.
Thank you for your comment that the pattern may need individual adjustment. First thought - it won't, my border measurements matchyours perfectly - but maybe I should check before I start tracing and cutting.
Just as well I did.
Pattern was too wide and would overlap the ends of my oval braid!!!
My solution was to do this.
I cut the trunk out of my pattern
My overlap onto my braids wasn't that great so I trimmed a quarter inch from each side of the pattern through the center.
With another sheet of paper underneath I repositioned my pattern to include the trunk and secured my Willow into place.
After a recheck it fitted so I traced, fused and cut my willow tree. When I started to fuse it down I discovered that my lower branches now extended past my stitching line for this border. I trimmed each branch to sit comfortably inside the stitching line. My cutting line for the border is marked but NOT trimmed at this stage and won't be until AFTER I attach the next border because this is a method I have found works for me.
This is my result.
I love how it looks and works with the corner block of the inner border but I am not completely happy.
I cut my tree as one piece but looking at the pattern I decided to add a different fabric for the trunk and am now not sure if I should have. I think it will be fine once the final applique border is in place. I also extended the trunk over my cutting line to allow for any adjustment later.
Using 2 new colors here I have added extra fabrics to my coverlet for what I feel is going to be a very intense final applique border of "swags" and " butterflies" plus flowers. The next border is scaring me, I want to only use fabrics I have already used within the quilt top but am not sure if this is going to be possible.
Still undecided I climbed my steps again and pinned LE back to the wall, until know I wasn't even sure which corner I had completed as she is getting so big, LOL
I am back to HAPPY, the slightly darker fabric for the trunk now works as it is not in my face like I felt it was viewing it up close.
I am gaining more and more admiration for the original maker of this marriage coverlet.
I look at the flow out through the corners, from the shape of the central vase to the leaves in the next cornerstone block and then to the Willow Tree. OMG when the final applique border is in place with it's fabulous Sun cornerstone blocks, how amazing and beautiful is Love Entwined going to be.
Esther, I am in awe of how you are making LE come to life and so thankful you are sharing your talent with us.
Was going to close here but this morning I have attached my last border - still have the eyelets to stitch in flower centers but can do that with the border on.
So one more photo,
I now know which corner I added my first willow too!!!
now to link with esther's WOW
Happy stitching everyone.
Jenny
Thursday, 12 June 2014
WOW 11th June
Hi Everyone,
What a.week this has been for me.
I was sewing away very happily on my LE border last Tuesday morning when a phone call from my manager at work turned my world upside down. "We have had administrators appointed"!!! At work we had all known for months that the company was in financial difficulty but it still came out of the blue especially as the last few weeks the company was recording great sales and we were all feeling very positive.
My sewing stopped, what would this mean for Steve and me was priority. Over the last week this has become clearer. I still have a job but now for the administrators, keeping the company going while hopefully a buyer is found. A conditional offer is on the table - but will they want me? - depends who they are and what they are selling, so I am updating my CV as we will all have to reapply for jobs if the sale goes ahead..
The bad news over.
We are have had an indian summer through our autumn months but Tuesday winter came with a vengance.
6 inches of rain in 24 hours but we got off lightly compared to Auckland and North Canterbury where my family live. No sewing got done, I was on the phone checking in with Mum and other family members.
Yesterday, a lovely calm day. Very wet underfoot but no damage at all, however I did discover that I have been too busy sewing to see what has been happening to our citrus trees.
Our grapefruit tree is laden and they are starting to drop. last year I made marmalde but we haven't eaten it all yet so can't see me making more this year!!!
This dwarf mandarin, ripe, falling and starting to rot on the tree. these are the easy peel variety and so sweet.
Guess I better get eating.
Our full size mandarin tree, now ready for picking, but ladders and I do not get on so our neighbour will be very welcome to visit.
Our Rosemary at the end of a raised vege bed. We leave it as late as possible each year to cut it back as bees love it and in Northland they are rapidly diminishing in numbers, Flowering has almost finished though so time for a prune.
I'm so glad I am late blogging this week as I visited the links to Esther's WOW this morning and Kerry in Ontario's link gave me the answer to a problem that has been troubling me with my part 12 borders.
Thank You so much Kerry, Your advice about color value and using gray scale has been wonderful.
Here is how it worked for me today.
I didn't want to repeat orange stems on every medallion so went for a lime/yellow fabric for the other stems.
On it's own this fabric is quite strong but in such small stems it is lost, although it does just show up here but not with my quilt pinned to the wall.
I used Kerry's gray scale and this is the result.
I once again bit the bullet and took a color pen to my stems; a single stroke through the centre as they are only 1/8 inch wide and already stitched into place and for me impossible to undo and replace..
Back to grayscale for a final check.
Thank You Kerry. you solved my problem. Not what I wanted to do but now my stems have a balance in this border. It has been a very hard background fabric to work with but the only way I could see to complete my LE.Never my intent, but now a must do. LOL
I have the last two flower medallions still to complete for this border and then to attach my border and mitre my corners ready for the willow trees to be appliqued into place next month
I have this last piece of curtain sample fabric hanging next to my LE at the moment.
Where all the other samples were approx 8 inches square this fabric is about a metre long and will be my willow tree's, The deepest of the bronzes I think it will be perfect!!!!
A last update to my future employment. A consultant from Workbridge dropped her card at work last week after hearing our news. Workbridge help find jobs for the disabled but want to expand their services to the general community. My first thought was how can she or they help me.
However, I saw her this morning, they have conact with employers throughout Whangarei and guess what, my thumbs are classed as a real disability which I try to hide as much as possible as I can't grip or work with any heavy or awkward shapes. I meet her again next week, she will have done some background work and I am feeling so much more positive about the future and now just want to sew.
Cheer's everyone, Jenny
What a.week this has been for me.
I was sewing away very happily on my LE border last Tuesday morning when a phone call from my manager at work turned my world upside down. "We have had administrators appointed"!!! At work we had all known for months that the company was in financial difficulty but it still came out of the blue especially as the last few weeks the company was recording great sales and we were all feeling very positive.
My sewing stopped, what would this mean for Steve and me was priority. Over the last week this has become clearer. I still have a job but now for the administrators, keeping the company going while hopefully a buyer is found. A conditional offer is on the table - but will they want me? - depends who they are and what they are selling, so I am updating my CV as we will all have to reapply for jobs if the sale goes ahead..
The bad news over.
We are have had an indian summer through our autumn months but Tuesday winter came with a vengance.
6 inches of rain in 24 hours but we got off lightly compared to Auckland and North Canterbury where my family live. No sewing got done, I was on the phone checking in with Mum and other family members.
Yesterday, a lovely calm day. Very wet underfoot but no damage at all, however I did discover that I have been too busy sewing to see what has been happening to our citrus trees.
Our grapefruit tree is laden and they are starting to drop. last year I made marmalde but we haven't eaten it all yet so can't see me making more this year!!!
This dwarf mandarin, ripe, falling and starting to rot on the tree. these are the easy peel variety and so sweet.
Guess I better get eating.
Our full size mandarin tree, now ready for picking, but ladders and I do not get on so our neighbour will be very welcome to visit.
Our Rosemary at the end of a raised vege bed. We leave it as late as possible each year to cut it back as bees love it and in Northland they are rapidly diminishing in numbers, Flowering has almost finished though so time for a prune.
I'm so glad I am late blogging this week as I visited the links to Esther's WOW this morning and Kerry in Ontario's link gave me the answer to a problem that has been troubling me with my part 12 borders.
Thank You so much Kerry, Your advice about color value and using gray scale has been wonderful.
Here is how it worked for me today.
I didn't want to repeat orange stems on every medallion so went for a lime/yellow fabric for the other stems.
On it's own this fabric is quite strong but in such small stems it is lost, although it does just show up here but not with my quilt pinned to the wall.
I used Kerry's gray scale and this is the result.
Where have my stems gone!!!! My color value was wrong and it has been bugging me for days!!!!
Back to grayscale for a final check.
Thank You Kerry. you solved my problem. Not what I wanted to do but now my stems have a balance in this border. It has been a very hard background fabric to work with but the only way I could see to complete my LE.Never my intent, but now a must do. LOL
I have the last two flower medallions still to complete for this border and then to attach my border and mitre my corners ready for the willow trees to be appliqued into place next month
I have this last piece of curtain sample fabric hanging next to my LE at the moment.
Where all the other samples were approx 8 inches square this fabric is about a metre long and will be my willow tree's, The deepest of the bronzes I think it will be perfect!!!!
A last update to my future employment. A consultant from Workbridge dropped her card at work last week after hearing our news. Workbridge help find jobs for the disabled but want to expand their services to the general community. My first thought was how can she or they help me.
However, I saw her this morning, they have conact with employers throughout Whangarei and guess what, my thumbs are classed as a real disability which I try to hide as much as possible as I can't grip or work with any heavy or awkward shapes. I meet her again next week, she will have done some background work and I am feeling so much more positive about the future and now just want to sew.
Cheer's everyone, Jenny
Wednesday, 28 May 2014
Love Entwined Progress
Hi Everyone, lovely to be able to blog again after nearly two weeks of no internet.
Amazing how you get so used to just clicking the mouse and being in touch with everyone, was an interesting couple of weeks but I did get lots done, including cleaning up the garden for winter.
I had just completed part 11 borders and attached them to my quilt top and was ready to upload this photo.
Loved making the part 11 borders. The oval braids I thought would be difficult but they were a real pleasure to both make and sew.
Because my border fabric has a textured surface I didn't draw placement lines for my braids, only marked major points and the placed the ovals by eye. There are several variations of curves along both these and my part 12 borders but I like this as it feels more free - if that is the right word.
Have tried to enhance a photo of my border fabric as I think the camera is being fooled by all the other fabrics and colors and showing this fabric as a lilac grey and it isn't!!
Not sure if you can really see the texture of this fabric. All the paisley pattern is a raised thread in a beige/brown, the background fabric is white and has a widthwise rib which has meant joining my borders and mitering corners for my part 11/12 borders to keep the flow same as in my narrow border.
The reverse of the fabric is beige showing white paisley. This fabric is 100% cotton and in my mind only, could have almost come from the era of the original Love Entwined, if they made fabric like this then which I doubt.
Gee, I do love how my vase looks in this photo, LOL
I did change my bird a little, did not like my gold wings as the bird seemed insignificant, wings replaced with dark burgundy and now my bird takes it's proper place in the bottom border.
Another change. I felt my pastel flowers in my Kimono fabric were just too soft so I bit the bullet and took color pencils to them - after testing on an offcut - am very happy with their slightly stronger tones.
Now to my part 12 border.
Being me I started early, I was up to date and knew I wanted my angels to be the same all around my border. I studied Esther's images in her intro notes but decided I wanted my dark angels inwards and my light angels out all around my border and my braids to match in the corners, so I used my part 11 pattern for this stage.
The first lucky charms were the perfect size for using the medallion center of my compass and instead of the rose the flower from my center also worked a treat. I tried Esther's shamrocks in different colors but settled for hearts, from Esther's Lily Rose - perfect size and shape - and just seemed to add to the marriage theme.
The small stems were a problem with my background fabric, I had struggled to make my machine stitched stems in the first border center medallion strong enough so decided I would use fabric and a very narrow zig zag stitch on them. Same zigzag stitch around my small hearts.
Esther's little flower's for the second medallion were fine, I used my machine's eyelet stitch for the centers.
The Center medallion, easy choice, a touch of the dark blue from the other border and gold eyelet centers.
Another medallion center for these lucky charms worked fine but I tried many options for the shamrocks before LE told me to just stay with hearts.
Border complete the most exciting moment, stitching my border into place and mitreing my corners.
I used a variation of Esther's method for mitreing my corners - Esther has a tutorial on her blog.
With the bottom border laid flat I folded my top border under on the diagonal until it had the correct alignment then pressed into place and carefully pinned along the folded edge. Next I simply blanket stitched along the folded edge and then trimmed away my excess fabric at the back.
A nearly invisible seam which will almost completed covered by the willow tree next month.
Back on my wall where I can view it all the time as I work on the next border.
I love how these borders have come together, Thanks so much Esther for giving us this wonderful pattern.
Linking now to Esther's WOW
Enjoy your week everyone, Jenny
Wednesday, 30 April 2014
Work on Wed 30th April
Hi Everyone,
Well I wasn't going to blog this week but today really is a WOW for me.
I knew that Judith, a member of the Dargaville Quilters Group that I belong to had sent a review of our biannual quilt show last year to New Zealand Quilter's Magazine. They were very interested and said they would look at covering it in their April edition, they only publish quarterly.
I knew the magazine would focus on the fabulous "Gum Digger's" art quilt by Ann Langman which I showed photo's of on my blog a few months ago.
But look what I saw when Steve bought me the magazine this morning.
My Thistle Block from Esther's Forget Me Not BOM has been published.
Am I over the moon or what !!!!! never did I think I would see any of my work published. Lol.
Although I acknowledged Esther's design on my quilt info, Esther's name is unfortunately not mentioned in the article, but they did say I used designs from a Yahoo Quilting Group to create my wall hangimg.
For those of you who joined Esther's group after FMN here is a photo of my wall hanging created from Esther's wonderful Forget Me Not pattern that is still available on her website.
I made two wall hangings, so I could make all 24 of Esther's wonderful blocks. This one my retro version with the thistle block that obviously NZ Quilter Magazine liked.
The other one.
My french provencale version, or so I like to think. Both background fabrics are my late Aunt's unused dress fabric.
I am still riding a high but to my current love that I can't leave alone.
My second border of Love Entwined part 11 is half way done and my little bird is made.
Now not sure if my fabric for his/ her wings was the right choice, know I can change it if I need too, will wait and see.
Linking now to Esther's Blog.
Enjoy your Wednesday, I am.
Jenny
Wednesday, 23 April 2014
Love Entwined on Wed 23rd April
Hi Everone, hoping you have had a Happy and Joyous Easter.
For us it was very quiet as no family here to share it with and closest friends were away.
It did however give me extra days for sewing my part 11 border and Steve was happy to let me stitch away to my heart's content.
What a journey this border has been for me, I think it has fast become my favorite so far.
This border I descibe after the beatles song Magical Mystery Tour as after completing the ovals and angels last week I wanted to start with the 4 star medallions spread along the border but while trying to decide what fabrics to use, my centre came to me.
A new fabric for my little heart flowers and centre, a fairy frost fabric so once again it has the gold overlay. Very happy with how the fabrics work so it was back to those stars and once again, NO my fabric choices wouldn't work for me. I was trying various Pink/ Mauve ideas plus my trying to use my inspiration fabrics when suddenly my other medallion and my Angel's Legs as I call them came to me and just fell into place.
This Medallion was going to be in Purple /Blue or so I thought until LE told me what she wanted, Lol
I had been trying both the hearts and the flower's in my star medallion and found the flowers were perfect size for the border, the hearts a little small until I put them on Esther's pattern circle for the border and then they popped out and looked great. Only thing I did wrong, or maybe it was my Angels guiding me, I put my dark fabrics against the dark angels and the light against the light angels, opposite to what I had planned. to do while following Esther's pattern.
I decided dark burgundy circles from my berry fabric would be perfect between the pink petals and they looked like S---!!! Far too dark for the soft pinks.
Laying on my lightbox were the hearts I had fused ready for the last little squares of my Lily Rose border and they are the same fabric I used in the center medallion, was this meant to be - they were the perfect shape and size and I love them.
So now it really is my Star Medallions and they just have to be blue, but my main blues I have used for my angels plus I don't want to use these fabrics in the medallions as they are not clear enough on my background Inspiration came from looking at my compass. I had used a very bright Turquoise Fairy Frost in the compass that I had felt was too stong for using in my center or zigzag borders, was it now time for it to reappear?
Oh WOW, I love this and my burgundy circles I didn't use made the perfect center, I can finish these tomorrow was my thought.
I know some of you think I don't sleep, I do but the next morning my first waking thought was I can't do 4 medallions in that fabric - it is sooo bright - it will take over the border. Rolled over thinking about it and 5 mins later was out of bed with the answer, Another sample of curtain fabric pinned to my sewing room wall - waiting for the right time- was it now!!!!
Yes, it was finally time to use it and the gold vase fabric I had used behind my hearts in the outer border was the perfect center. Here you can also see how the different heart from my inspiration fabric works for this partof the pattern. So how does my border look now.
Did not photograph very well but Four bright Turquoise stars would have definately been too much but the dark blue has balanced it out well - at least in my mind.
The final part of this border is my stems or angel legs and these have been another part of my mystery tour with this border. I was going to machine stitch them, then I wasn't, then I just left them till last.
This morning I tried different threads for stitching and different fabrics to applique them, finally I think I have the answer.
Not stitched yet and a little rearranging to do but after all sorts of options I am going with the new fabric I used for those wee hearts, it seems to work against both the light and dark angels.
Before I fuse the rest of the stems I really need to put this against LE and see if I have harmony.
Up on a chair and step stool to rehang my Le sideways so I can put the correct borders together, more pinholes for DH to fix later, Lol
Still only the four "legs/stems" in place but yes they need to be fabric not a machine stitch.
I know now my background fabric will work for this border, but I have to complete the next border to give it balance. Oh well it is the reason I saved my background fabric!!!!
Cheers everyone for this week. Enjoy your Wednesday, I am.
Jenny
Subscribe to:
Posts (Atom)