Wednesday 29 March 2017

WOW 29th March. Easter Blessings

Hi everyone,

Hope you are all having a great week, mine has disappeared so quickly but I have been enjoying myself. Thursday is my day for joining friends for a sit and sew session so last week it was time to make more hearts for Luv Shack and there was room to layout my top and place them ready for stitching.


Pleased I took this photo before starting to stitch as can see one heart that needs to move a little.
My intention was that the hearts would be randomly placed and hopefully when finished and all the little hearts are added it will look random but my brain won't let me work like that, I need them to be precise and balanced so it will be interesting to see what it looks like in the end.
Planned to have a week of stitching the hearts and getting lots further before Esther releases part 3 of Secret Garden on Saturday but some one said the best laid plans of Mice and Men or something like that go astray and they did for me when Esther gave us Easter Blessings on Friday. have all the Easter patterns that Esther has designed over the years but have only made one other, it was also called Easter Blessings and was 2013 project.


Pattern was for a mini quilt and I didn't increase the pattern at all ( was meant to be increased by 200%) so my finished quilt is 9 1/2 inches square and was so much fun to make.
Maybe that is why I couldn't resist another easter project with the same name or maybe it was the delightful Bunny in this years pattern.
Knew I still had some of the velvet type fabric I had used for the bunny last time, found it on Sunday and was underway.


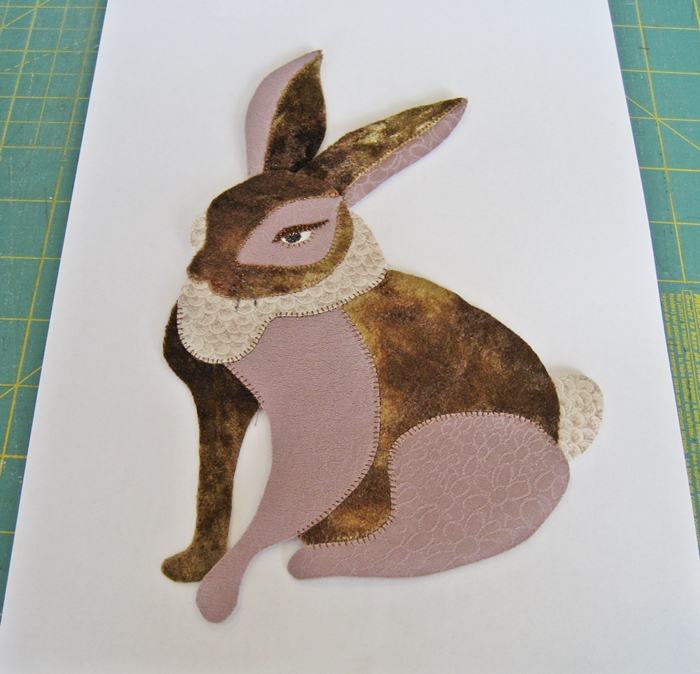
Put together on baking paper over my pattern

The fabric is shaded  so was able to fussy cut my pieces  and used a  piece of silk kimono fabric that is also textured for his legs and face. the ridge that shows I trimmed away after stitching.


Initial stitching on heavy tearaway.

As I was going to pad him/her I did the internal stitching with my bunny on heavy tearaway using a bronze metallic thread. Eye is reverse applique adding the eyelid afterstitching the eye itself, also stitched the right whiskers at this stage.


Padding cut and placed.
Decided not to pad both front legs so the one without padding will appear to be further back when stitched.


Padded and ready for placement.

At guild in Auckland last month there was a collection of furnishing samples being given away and I got some in muted pastels one of which kept tempting me to use it as my background. Was going to be a challenge but decided to go ahead.


Looked like random colours till it was hanging and the flowers became obvious

A soft green Jinny Beyer fabric for my tablecloth and this time I only fused the edges so I can cut away the background fabric. Love the fabric but not sure that I haven't made things more difficult.


 Bunny looks lovely but is my vase too light.


Where I am at this morning.

Seems to be coming together and with there being no pinks or yellows in my background am hoping using those shades for my flowers will make it all work.
Am heading back to sewing room to carry on. would love to know what you think.

Cheers Everyone, Jenny 

Wednesday 22 March 2017

Work on Wed 22nd March

Hi Everyone,

Didn't blog last week, nothing much to show as had been making hearts for Luv Shack and only had a pile of hearts and an idea of what I wanted to do as had found a free pattern online for a small wallhanging designed by Jane Spolar and I really liked the heart shape and the simple design.


Discovered that by cutting carefully and reusing the cutout shapes on a second base I could make the hearts in both positive and negative making for less waste though both hearts had to face the same direction. With my red fabric selection made plus a few others it was time to play on my background.


Playing with placement of my red hearts.
Idea is that the hearts will colourwash out from the center to golds and then yellows, 
Decided to leave out the swirly bits and just use the "stems" and flowers as my accent .Although I had laid out more hearts I needed to fuse and stitch what I was happy with.


Happy so far, the gaps will continue placing hearts of this size and then look at filling the gaps with smaller hearts of varying sizes and shades.

Work stopped last Tuesday afternoon when Esther released block 3 of Diamond Hill. had been looking forward to the one with the big leaves and hooray it was that one. In the pattern it sits diagonally opposite block one so I knew what fabrics I wanted to use but my block 2 was bolder so needed to get the balance right with this one.


Leaves and first flower
Made my big leaves first and made the mistake of not putting it on my wall and standing back and taking a good look before diving in and stitching my bright green. There was no problem with the bright green but my darker green was too dark and was hard to see against the background. Changed the top of the leaf to the mid green which helped but didn't fix it completely so searched through my threads to find a brighter green thread that was still in the right colour family. It helped although still wish I had used the mid green.
Another issue at this point  was running out of my lime green Batik, enough for D Hill but had also used it on my Luv Shack and not enough for both. LQS had one that looked identical so decided to keep what was left for LS and use the new one for the rest of D Hill. Look closely and you can see that the smaller leaves are a different shade and so is the thread as was running out of that as well.
The changes look fine though so got away with it.
Used double blanket stitch for the leaves and single for the stems which has given more prominence to the leaves. First flower is the same orange fabric as block 1 but with double blanket stitch.
With all my double blanket stitch I am using a heavy tearaway under my stitching and removing afterwards to prevent any puckering.


Next two flowers
Pink flower is again same fabric as block 1 but used a variegated pink for my stitching and love the effect it has given. But the lavender flower was a disappointment at this stage.
Thread matches fabric too closely and the stitches created a whirling look around the flower, felt dizzy looking at it. Searched through all my threads and tucked away in a sample box  found a 12wt egyptian cotton in very soft variegated lavender so stitched my other flower with that and it was so much better. Being thicker I only used single blanket stitch. Happy with the result I restitched my first flower.


Amazing what a difference the thread can make.


Finished apart from the vase and non of the issues making it matter any more.

Today its back to making some more hearts for my friends quilt so am linking now with Esther's WOW and heading back to my sewing room.
Enjoy your stitching everyone.
Cheers Jenny

Wednesday 8 March 2017

Secret Garden Two

Hi Everyone,
Has been a week where I haven't wanted to leave my sewing room. Esther's second block of Secret Garden is so pretty I couldn't wait to start. Knew straight away I wanted a soft yellow vase as again it reminded me of the old fashioned ceramic vases of my mother's. Had struggled to find the right yellows in my stash for the flowers in Block 1 so had purchased a fairy frost last week that I wished I had had at the time it was going to be perfect but first for the iside of the vase.


A toning batik with fairy frost edge.


Front of vase  lightly padded and placed on stabiliser to stitch the lower inner line before adding to my block as I don't want to flatten this edge.


Stitched in place with edge part unstitched for stems and leaves'

  
Stems and leaves stitched.
the fine Bleubell leaves were too narrow for applique so drew in with an air vanishing pen and stitched with two rows of triple stitch in a variegated thread for softness.
Used a heavy stabiliser behind my fabric to keep the stitches from pulling. 
Ink is meant to disappear in 3 to 5 days but with the temp and humidity at the moment could only draw one branch at a time as it fades so quickly.

Then 54 bluebells!!!, traced and cut them all out at the sit and sew group on thursday, Yay, no machine to lug in, Had a multi coloured batik which was perfect as could just trace  a group close together and pick a patch of fabric to fuse them to.


Thought stitching them all would be tedious but I found it really relaxing maybe it was the soft colour I was working with.


With my flowers I wanted to create a trumpet effect so decided to stitch my inner lines before ading to my block. Left ends at start and finish and after removing the stabiliser folded the ends to the back and secured them to my fusing with the tip of the iron.


No knots at the edges and no chance of them coming undone.
Added light padding and stitched to my block.


For my trumpet effect I stitched lines fanning out from the base .
With the padding behind there is slight vertical puff rather than the horizontal puff I would have got from stitching the inner applique edges at this stage.

Didn't plan to thread paint my bird so no progress photo's. 
 Worked from my image of a Javan Green magpie


Printed the photo then reversed it on my light box and traced the very well defined markings then enlarged my tracing to the size of my pattern, Amazingly the shape was very similar to Esther's bird so used a bit of both, ended up with a slightly plumper bird but he eats well in the secret Garden.

After making him I wanted stitch his eye and enhance just the wing and crest, so cut out his eye and put white behind to reverse applique it and add the burgundy ring around it.
Here's how I stitched him.
Put him onto heavy tearaway stabiliser,  no fusing or basting necessary,started to stitch and it was going so well I didn't stop. Had my photo alongside for reference.
It really is just follow the flow, I didn't do the normal free motion as I wasn't going to get carried away but I loosened my pressure foot so that the fabric could move easily for stitching curves and with the size it was easy to stop and turn the work for the next line of stitching.
Stayed just inside the outer edge of my fabric while stitching so that had no stitches were hanging loose or had to be cut when the stabiliser was removed.
To put him on my background I added some fusing to the back to help secure him then stitched the raw edges with matching threads blending in to the other stitches with shor tcurved lines of straight stitches a bit like darning along the edges, some parts I did with little blanket stitch but then stitching over it with straight stitches. 


Cheated and used a variegated thread for the body and it worked really well.
It's not as fully stitched as it should be as didn't want to push my luck with how well it was turning out.
Only thing left was the chain which was always going to be machine stitched. Tried to find embroidery stitches similar to what Esther had drawn and use my machines memory to link them together. it worked in practice and I thought I was all good to go so I stitched them onto my block.


Doesn't look bad in the photo but the bottom elements stitched out of proportion and
 it needed more length plus my thread was too light. It is my favourite soft gold metallic thread but it didn't show up. Was scared to unpick in case I damaged the fabric but it wasn't staying there.
With stitching safely removed I added a narrow strip of fusible behind where I had stitched and pressed it to my stabiliser to reinforce it for my next attempt.
Checked into the group before I started and Bunny had just posted some samples she had been playing with, one I loved so back to my machine and I found one very similar.
It had to be easier not mixing stitches and it was.


So much better.
Used a deeper shade of gold thread, made it longer and added a ring with eyelet stitch to the bottom  and am very happy with my chain.


Thrilled with how it looks and it's even better when the two blocks are together.


Am so happy to be making Esther's Secret garden Pattern

So how am I filling my days till the 15th, My friend in Auckland that I made Frog Song for last year would like a quilt for their Bach or "Luv Shack" as they have named it. She's thinking of hearts/ bright / fun so thats my brief and the name taken care of.


While at Sit and Sew last Thursday found this pack of 8 half metre lengths of bright Fusions fabrics plus the little all over hearts fabric so have all my fabrics. have ideas for the style but still playing.

Today though I have to take care of this.

Have been looking for this for months.
When we added our ensuite I had to pack away what was stored in my then sewing room cupboards and a lot went into storage bags including all these old embroderies, linens and doilies done by my late Aunt and Mum plus some of my early quilting. All the bags came out when the hall cupboards were finished a few months ago, but this one was missing. Yesterday Steve finally found it buried in the garage, inside a spa bath we haven't installed and covered with lengths of timber.
Nothing has suffered any damage so today I'll go through everything, find it all a new home and enjoy the memories along the way.

Enjoy your week everyone,
Cheers Jenny.
PS heres a photo of Frog Song for those who haven't seen it.


Wednesday 1 March 2017

WOW 1st March Diamond Hill part 2

Hi everyone,

Ran out of time to post last week as had been having such a ball with the second of the  Diamond Hill blocks that completely forgot which day was which until it was too late. Think have finally got my head around DHill being bright and Secret Garden being soft and delicate so let myself go with my brights and my second block is even brighter than my first.


Decided this is the perfect quilt to let my machine applique stand out so tried out my double blanket stitch for the flowers which has a much larger stitch than I normally use. Also chose to use thrads that were slightly brighter than my fabrics to make the stitching stand out even more. After stitching the orange flower it was off to town as was not going to have enough thread to finish the block and although I had the aqua thread had no bright blue either.


Have padded my flowers slightly and with the bold stitching they really do pop off the background.


Had to really watch my points and curves with the bigger stitch, default setting is 3 length by 2.9 width so about 4 stitches from the points reduced my width for each stitch to  2.7  then 2.4 to 2.2 finally 2.0 for the stitch at the point then back out again on the other side, this meant I don't have overlapping stitches at the points.


Have taken a different approach to the vase with this block and have redone my first vase. Had appliqued my vase to the background fabric but this was making it too stiff as had fused the complete vase. For this vase I cut my strips then just fused a quarter inch at the top of each strip to hold them together then fused the top edge into place on my block and cut away the background from underneath. Won't stitch until the borders are in place so that I can stitch the triangles at the same time.
Unpicked top edge of my first vase and redid it the same way.


With block 2 finished I decided to play with the emboidery stitches on my Bernina, have not really used them and Diamond Hill has encourage me to play a little.
Had seen a heart quilt designed by Sarah Vedeler where the applique was embellished by embroidery machine, don't have that but wondered if I could do something similar with just my stitches so made a big heart and followed the design of one of her blocks.


My version of a Sarah Vedeler Heart Block
Not any where near as detailed as the original but yes my machine can create some interesting stitches.
Mind you I was exhausted afterwards with the concentration of stitching accurately.

Well now it's Wed 1st march and I was awake super early knowing that Esther is realeasing part 2 of Secret Garden today. Last month it arrived in my mailbox at about 1am so was sure it would be there at 4am. It wasn't and I still haven't received a new email link but when I went back to the payment receipt link from a week ago block 2 was attached to that.
Thankyou Esther, block 2 is even more lovely than the first block, the bird sent me to the internet as my first thought was a magpie but we only have black and white ones in NZ and that didn't seem to fit. Gosh, they come in all sorts of colours and think I may have found the one for me.


A Javan  Green Magpie
he looks so cute.
Think he will go well with Lilies and Bluebells so am off to make a start on my vase.

Linking now to Esther's WOW

Enjoy your week everyone,
Cheers Jenny